I use Arch, BTW
I use Arch, BTW. And you can too!
The initial setup to getting to a useable Arch install can be daunting, and I had to read a bunch of different sources to learn how to do things the right way. Generally speaking I don’t expect this guide to help anyone else because I’m not doing anything weird here, but hopefully it will help someone. And if not, this will help me if I ever need to install another Arch box. Generally speaking, a lot of the setup will be a step-by-step interpretation of the actual Arch Linux Installation Guide, but there are a few steps I take which are a bit unorthodox so I will document those here. Otherwise this setup process may seem awfully familiar to those of you who have done this before.
VMWare Setup
I use VMWare Workstation for all my local virtual machines. I used to use Virtualbox, but then one day I decided to take the plunge and get myself a copy of VMWare Workstation. The initial buy-in is pretty steep, but I can tell you in my personal experience it is the single greatest purchase I’ve ever made for my setup. Instant labs, instant working desktops, it’s just a pleasure to work with and I can’t see myself ever going back.
That said however, it is hard to compete with Virtualbox’s $free.99 pricetag, so I’ll try to be as agnostic as I can with my setup.
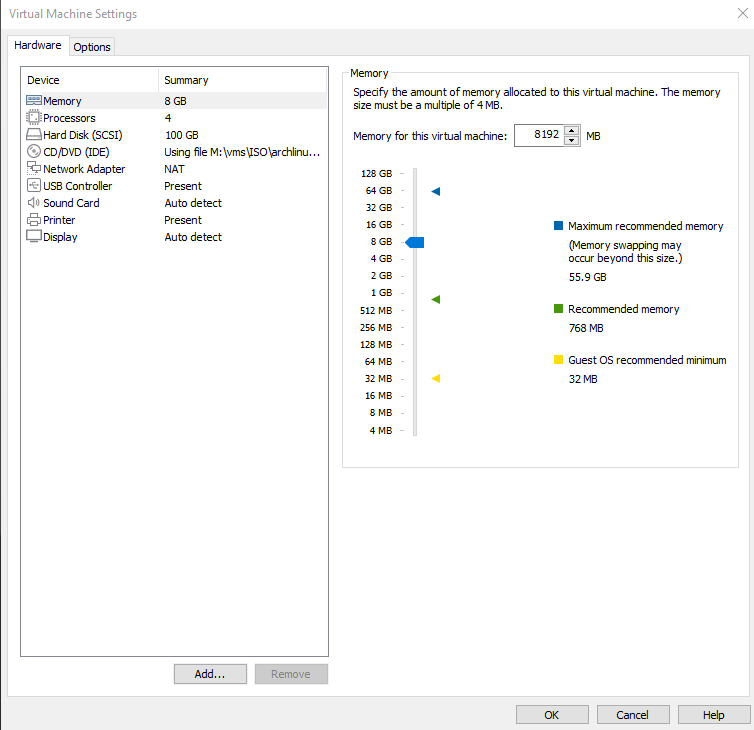
For my Arch virtual space, I set the resources used to 8Gb of memory, 100G of disk space, and 2 dedicated cores with 2 threads each, totaling 4 threads.
Get yourself the latest arch linux .iso file (It is a rolling distro, so this is likely to be updated often) and boot your virtual machine into it. Of course if you are doing this on raw hardware then you’ll need to copy this to a USB medium or…do people still use CDROMs anymore? I assume not. Whatever.
Initial Boot
My setup will follow the standard installation steps on their website, which handles a lot of the heavy lifting but could be altered slightly in my opinion. So that’s the first place you should start to bootstrap the entire OS, and we can worry about starting up a GUI afterwards. For now though, I will operate as if I’m making a reaction video, just in text form. Or something.
By default, Arch’s console keyboard is set to US, so that’s good enough for me. I’ll skip past that part.
Generally speaking, in a virtual environment, unless you messed with the network settings then it should have polled DHCP to obtain an IP address, so nothing needs to be done here. Just confirm that ping -c1 archlinux.org actually returns a valid ping-back.
Also, again unless you messed with the settings in VMWare or Virtualbox, timedatctl should show that the time synced with the hardware clock, so that should be fine.
Now, for the disk setup.
Disk Setup
Perhaps this is somewhat controversial, but my basic disk structure is generally as simple as possible. Unless this particular machine I’m building has a specific use that requires some sort of…well, old school methods of giving /var and /usr its own partition so they don’t blow up the system if they run out of space, I think it’s best to have everything on /, with /boot having its own partition. Sure some people want /home to have its own partition, and I totally get that. Easy to just move the /home directory from one machine to another, or just blow away everything in / and maintain /home so you can effectively reformat the entire OS and not have to deal with backing up the user’s home directory, but in my opinion that’s just…too much work. I’m lazy. And frankly I just don’t care enough about that if this is a virtual machine. I may think differently on bare-metal hardware, but for the sake of simplicity this is my intended partition layout:
1
2
3
4
5
6
7
8
9
10
11
12
Disk /dev/sda: 100 GiB, 107374182400 bytes, 209715200 sectors
Disk model: VMware Virtual S
Units: sectors of 1 * 512 = 512 bytes
Sector size (logical/physical): 512 bytes / 512 bytes
I/O size (minimum/optimal): 512 bytes / 512 bytes
Disklabel type: dos
Disk identifier: 0xf26ab14f

Device     Boot   Start       End   Sectors  Size Id Type
/dev/sda1  *       2048   1026047   1024000  500M 83 Linux
/dev/sda2       1026048   5220351   4194304    2G 82 Linux swap / Solaris
/dev/sda3       5220352 209715199 204494848 97.5G 83 Linux
And to achieve that, I’ll use fdisk. Specifically, the command will be:
1
fdisk /dev/sda
At this point, I’ll make my partitions. All primary partitions! I ain’t got time for no nonsense.
Boot Partition
Type n for new partition, then p for primary. Choose partition number 1, choose the default start sector by just hitting [enter], then adding the boot partition by making it a size of 500 Mb, so enter +500M. Then hit p again to print out what you have. Should look like this:

Swap Partition
Don’t listen to anyone that tells you otherwise, you will need swap space. For my own purposes, I’m going to give myself 2 Gigs of swap.
Type n for new partition, then p for primary, then choose partition number 2. Choose the default start sector which should be where the first partition ended, so just hit [enter]. Now tell it +2G to give it our intended size. It will give it the default type of Linux. That was fine for the boot partition, but we need to label it as swap, so let’s modify it’s label.
Type t to modify a partition type, then choose partition 2 for the swap space. It asks for a hex code, but you can print all the hex codes by typing L:
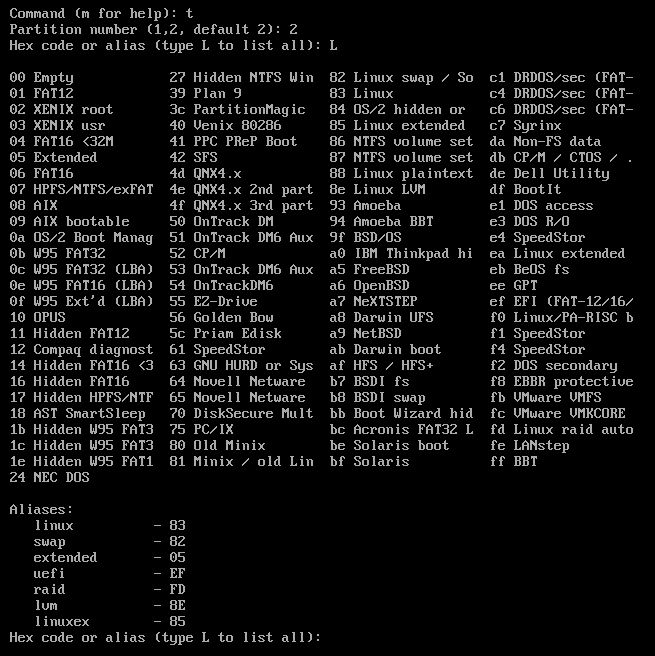
Oh, they also just have aliases. I suppose I can just type swap here. Up to you. Either type swap or 82.
/ Partition
Finally, the remainder of the disk. This is super easy, you’ll want mostly the defaults.
Type n for new partition, then p for primary. Choose partition number 3, hit [enter] for the default start sector, then hit [enter] again to choose the absolute last sector on the disk. This will encompass the rest of the hard drive, and this will be where I will store everything on the root drive.
Ok, now that that’s all taken care of, time to write our changes to disk. Make sure everything looks good by typing p to print the partition structure. If it looks like the above proposed structure, we’re all good. Now all we need to do is write changes to disk. Just type w here and it will commit everything.
No turning back now!
Formatting our partitions
Here we’ll just write the file system to our partitions. A long time ago I used to use ext2 to the /boot directory because none of the journaling capabilities were needed here, but I don’t think it really matters much anymore (though I could be wrong, as I often am), so just format everything to ext4 except for swap, or whatever file system you want. I’m going to use ext4 though. If you want to be some yuppie weirdo drinking their fancy coffee with their waxed moustache and parked electric unicycle, feel free to use something like reiserfs or something. I won’t judge you for supporting a murderer.
Anyway, I’ll first enable the swap partion:
1
mkswap /dev/sda2
Then I’ll run mkfs.ext4 on the two other partitions I created.
1
2
mkfs.ext4 /dev/sda1
mkfs.ext4 /dev/sda3
Now that that’s done, I’ll mount the root partition to /mnt and build from there.
1
mount /dev/sda3 /mnt
Then I’ll mount the /boot partition into the mounted root partition, with the --mkdir flag to create it.
1
mount --mkdir /dev/sda1 /mnt/boot
Finally, I’ll turn on the swap space.
1
swapon /dev/sda2
Now it’s time to pacstrap!
Pacstrapping
Pacstrapping will install the bare minimum files onto a partition structure to get us going to build the system in the way that we want it. I’ll pacstrap a few more packages than the installation documention mentions just for my own convenience.
1
pacstrap -K /mnt base base-devel linux linux-firmware vim man-db man-pages texinfo
Hit enter on this and give it some time. This will take a bit.
Once that’s done, we’ll generate the fstab file defined by the disks UUID.
1
genfstab -U /mnt >> /mnt/etc/fstab
And finally, time to chroot into arch, essentially entering our bare minimum arch OS, minus a few things necessary to boot properly.
1
arch-chroot /mnt
Chrooted Properly
Now that we’re in a chrooted environment, we have to bootstrap the whole thing so it will load properly and persist on reboot. Once we’re at that point, I can begin to customize things to my liking. But until that point, let’s roll up our sleeves and keep working.
Time to set my local time zone by symlinking the zoneinfo file to /etc/localtime:
1
ln -sf /usr/share/zoneinfo/America/New_York /etc/localtime
Then we’ll sync our hardware clock:
1
hwclock --systohc
Next, uncomment the proper locale.gen using sed:
1
sed -i 's/#en_US\.UTF-8 UTF-8/en_US\.UTF-8 UTF-8/' /etc/locale.gen
Generate the locale…
1
locale-gen
Then set the LANG variable in /etc/locale.conf
1
2
3
cat > /etc/locale.conf <<EOF
LANG=en_US.UTF-8
EOF
Set your Network hostname to something appropriate:
1
2
3
cat > /etc/hostname <<EOF
arch-btw
EOF
…or whatever hostname you would prefer.
Then set the root password:
1
passwd
Now time to install grub and NetworkManager, so we can actually boot into an OS and have networking when we do.
1
pacman -S grub networkmanager
Now enable NetworkManager so it will start with the OS.
1
systemctl enable NetworkManager
Now install grub.
1
grub-install /dev/sda
And finally, create grub’s config!
1
grub-mkconfig -o /boot/grub/grub.cfg
At this point it’s time to reboot and see if it boots properly into an arch environment. Exit and unmount the partitions. You probably don’t need to unmount but I feel like there’s a level of OCD that forces me to do it. Then just reboot and hope it boots properly!
1
2
3
exit
unmount -R /mnt
reboot
A Running OS
At this point you should boot into a login prompt. We are officially running Arch! Log in as root and create a new user.
1
2
3
groupadd sudo
useradd -m -G sudo agr0
passwd agr0
Now I’m oldschool and always type vi when I really mean vim.
1
ln -s /usr/bin/vim /usr/bin/vi
Edit the sudoers file and uncomment the line mentioning people in the sudo group have access to run sudo.
1
visudo
Time for a GUI!
Now time to install the GUI. The GUI I’m going to install consists of 3 basic parts: A window system, a display manager, and a desktop environment. The window system I will use is xorg, the display manager (which is the login service used to start a session in a particular environment) I’ll use is sddm, and the desktop environment I’ll use is KDE. Obviously you can choose whichever you want here. I hear cinnamon is pretty nice, but KDE works really well for me.
1
pacman -S xorg
And yeah, install everything there.
Now KDE and SDDM
Install the display manager and the desktop environment here.
1
pacman -S plasma plasma-wayland-session kde-applications sddm
Choose all the defaults. Once this starts, go and get yourself a glass of water because this will take some time.
Once that’s done, enable sddm to start at boot.
1
systemctl enable sddm.service
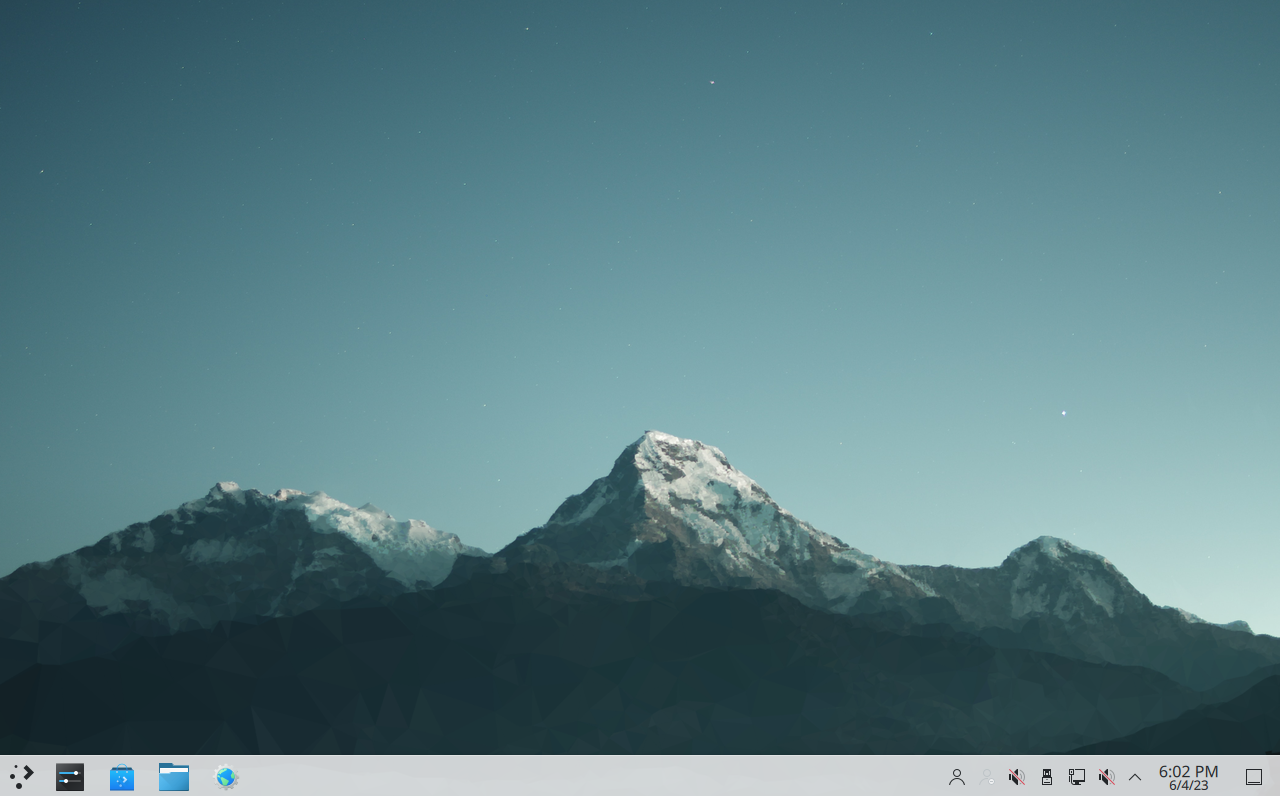
Now reboot…and you should see a login screen to log into your KDE environment! Voila!
OK! Now since I’m using vmware, I need to install the open-vm-tools so I can do things like copy and paste between the host OS and the guest, as well as instant resolution fitting by window resizing and such, so let’s open up a terminal and install that.
1
2
3
sudo pacman -S open-vm-tools gtkmm3
sudo systemctl enable vmtoolsd.service
sudo systemctl enable vmware-vmblock-fuse.service
Now restart again and it should fit to your VMWare window. Nice.
VMWare and KDE Quirk
One thing I noticed was a failure for the cut/copy/paste feature between VMWare guest and host would just never work, but only for KDE for some reason. I think it has something to do with a race condition which would get in the way of the vmware-user agent from starting because something would start before it…whatever the case, this slight tweak seemed to work fine.
First, create the following script in /usr/bin/vmware-user-suid-wrapper:
1
2
3
4
5
6
7
8
9
10
11
12
13
14
15
16
17
18
19
20
21
22
23
#!/bin/sh
MAX_RETRY=8
RETRY=0
SLEEP=1
unset SESSION_MANAGER
# If running systemd, skip the delay loop as starting vmblock-fuse is not enforced

if file /sbin/init | grep -qv "systemd"; then
    while [ $RETRY -lt $MAX_RETRY ]; do
    if [ -f /var/run/vmblock-fuse/dev ]; then
        RETRY=$MAX_RETRY
    else
        logger "Try $RETRY/$MAX_RETRY: /var/run/vmblock-fuse/dev not available. Sleeping for $SLEEP seconds"
        sleep $SLEEP
        RETRY=$(($RETRY + 1))
        SLEEP=$(($SLEEP * 2))
    fi
    done
fi

# Unconditionally start vmware-user-suid-wrapper (after waiting for vmb lock-fuse if not under systemd)
sleep 5
/usr/bin/vmware-user-suid-wrapper
The above was taken from this thread.
Now add the following new file: /etc/xdg/autostart/vmware-user-autostart.desktop
1
2
3
4
5
[Desktop Entry]
Exec=vmware-user-autostart-wrapper
Name=VMWare User Agent
Type=Application
X-KDE-autostart-phase=1
Final Customization
One last thing before you go crazy, I highly recommend adding these additional lines to /etc/vimrc:
1
2
set mouse=
set ttymouse=
I have no idea who thought using a mouse with vim was fine, but I assume they need counseling and I hope they get the help they need.
Final Thoughts
This is basically everything you need to get started with your customization journey. From here you can install VSCode, or Sublime Text, or a sensible browser like Firefox, or really whatever you’d like. The point is you got over the hump and the sky is now the limit.
Hope it helped somebody. Though really I think I will publish this just so I can go back to this whenever I need to build another Arch machine.